Selenium Walkthrough

This tutorial will get you up and running with the Selenium WebDriver API. If you want to catch up on the Selenium basics try reading this introductory material.
What you will learn
You will learn how to mimic usage of the following HTML elements:
- A link
- BUTTON
- checkbox
- SELECT combo box
- alert box
- TABLE
selenium2).
Example Website
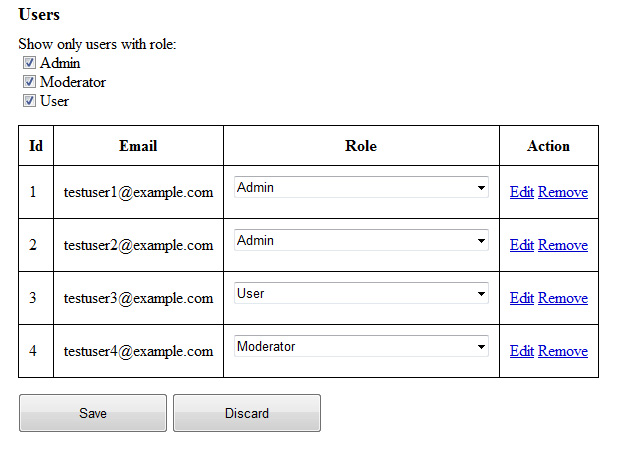
Suppousedly, we have built an admin panel for managing users, which looks like this:

With the following HTML code behind:
<h2>Users</h2>
<div id="filter-by-role">Show only users with role:<br />
    <input type="checkbox" checked="checked" value="Admin" />Admin<br />
    <input type="checkbox" checked="checked" value="Moderator" />Moderator<br />
    <input type="checkbox" checked="checked" value="User"/>User
</div>
<table>
    <tr>
        <th>Id</th>
        <th>Email</th>
        <th>Role</th>
        <th>Action</th>
    </tr>
    <tr>
        <td>1</td>
        <td>testuser1@example.com</td>
        <td>
            <select id="role_1">
                <option>Admin</option>
                <option>Moderator</option>
                <option>User</option>
            </select>
        </td>
        <td><a href="#">Edit</a> <a href="#">Remove</a></td>
    </tr>
    <tr>
        <td>2</td>
        <td>testuser2@example.com</td>
        <td>
            <select id="role_2">
                <option>Admin</option>
                <option>Moderator</option>
                <option>User</option>
            </select>
        </td>
        <td><a href="#">Edit</a> <a href="#">Remove</a></td>
    </tr>

    <!-- for clarity other users commented out -->

</table>
<div id="save-discard">
    <button>Save</button>
    <button>Discard</button>
</div>
We would like to test a scenario, where:
- User opens the site, enters admin panel.
- User wants to filter out all admin users, so he unchecks the "Admin" checkbox.
- User promotes the third user (id=3) to being a "Moderator".
- User deletes the fourth user (id=4) by clicking "Remove".
- Finally, user clicks the "Save" button and confirms on the alert box.
Expected Result
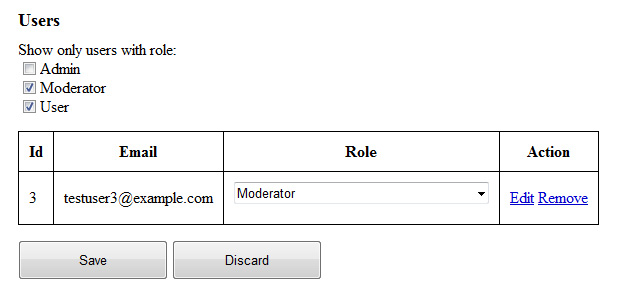
After the scenario admin panel should look like this:

Here is a recording of the scenario:
Unchecking the checkbox
We would like to uncheck the "Admin" checkbox:
<div id="filter-by-role">Show only users with role:<br />
    <input type="checkbox" checked="checked" value="Admin" />Admin<br />
    <input type="checkbox" checked="checked" value="Moderator" />Moderator<br />
    <input type="checkbox" checked="checked" value="User"/>User
</div>
So we lookup the INPUT with value "Admin" inside the filter-by-role DIV:
WebElement adminCheckbox;
// CSS Selector
adminCheckbox = driver.findElement(By.cssSelector("#filter-by-role input[value=Admin]"));
// ...or equivalent XPath
adminCheckbox = driver.findElement(By.xpath("//div[@id='filter-by-role']/input[@value='Admin']"));
adminCheckbox.click();
Here is a small explanation of the used selectors:

It is up to you, whether you choose XPath or CSS selectors, but sometimes one works better than the other. We will learn about it in a moment.
Selecting option in the combo box
We want to select "Moderator" for the user with id = 3:
<select id="role_3">
    <option>Admin</option>
    <option>Moderator</option>
    <option selected="selected">User</option>
</select>
So we find a WebElement with id role_3 and wrap it inside a Select object:
Select roleSelect = new Select(driver.findElement(By.id("role_3")));
roleSelect.selectByVisibleText("Moderator");
Clicking the "Remove" link
We would like to click the remove link in the fourth row (user with id = 4).
<tr>
    <td>4</td>
    <td>testuser4@example.com</td>
    <td>
        <select id="role_4">
            <option>Admin</option>
            <option selected="selected">Moderator</option>
            <option>User</option>
        </select>
    </td>
    <td><a href="#">Edit</a> <a href="#">Remove</a></td>
</tr>
Unfortunately, we cannot use any By.id selector, so we have to choose:
- We come up with a clever selector or...
- We end up with foreach loops searching for the row with id = 4 and link with text "Remove".
String removeXpath =
        "//table" +                    // any table
        "//tr[contains(td[1], '4')]" + // any tr that contains '4' in first td
        "/td" +                        // a single td
        "/a[text() = 'Remove']";       // a link containing 'Remove'
WebElement removeLink = driver.findElement(By.xpath(removeXpath));
removeLink.click();
To better understand this XPath selector take a look at this explanation [click to enlarge]:

Clicking the "Save" button and confirming changes
Finally, we click the "Save" button and confirm our changes:
<div id="save-discard">
    <button>Save</button>
    <button>Discard</button>
</div>
Clicking the button is very straightforward:
WebElement saveButton = driver.findElement(
        By.cssSelector("#save-discard button:first-child"));
saveButton.click();
Fortunately, alert boxes are also simple to use. When we encounter the invocation of a JavaScript confirm("Save changes?"); function, we have to switch to the alert window and then accept it:
Alert alert = driver.switchTo().alert();
alert.accept();
It will act like user clicked the OK button on the pop-up window. If you would like to cancel instead, use the Alert.dismiss() method.
The End
Here ends our quick tour. I hope you enjoyed learning about the Selenium WebDriver API.